
Grey Herons – How do you photograph them?
Grey herons – how do you photograph them? Practical UK tips on fieldcraft, settings, light and composition for sharper still and flight shots.
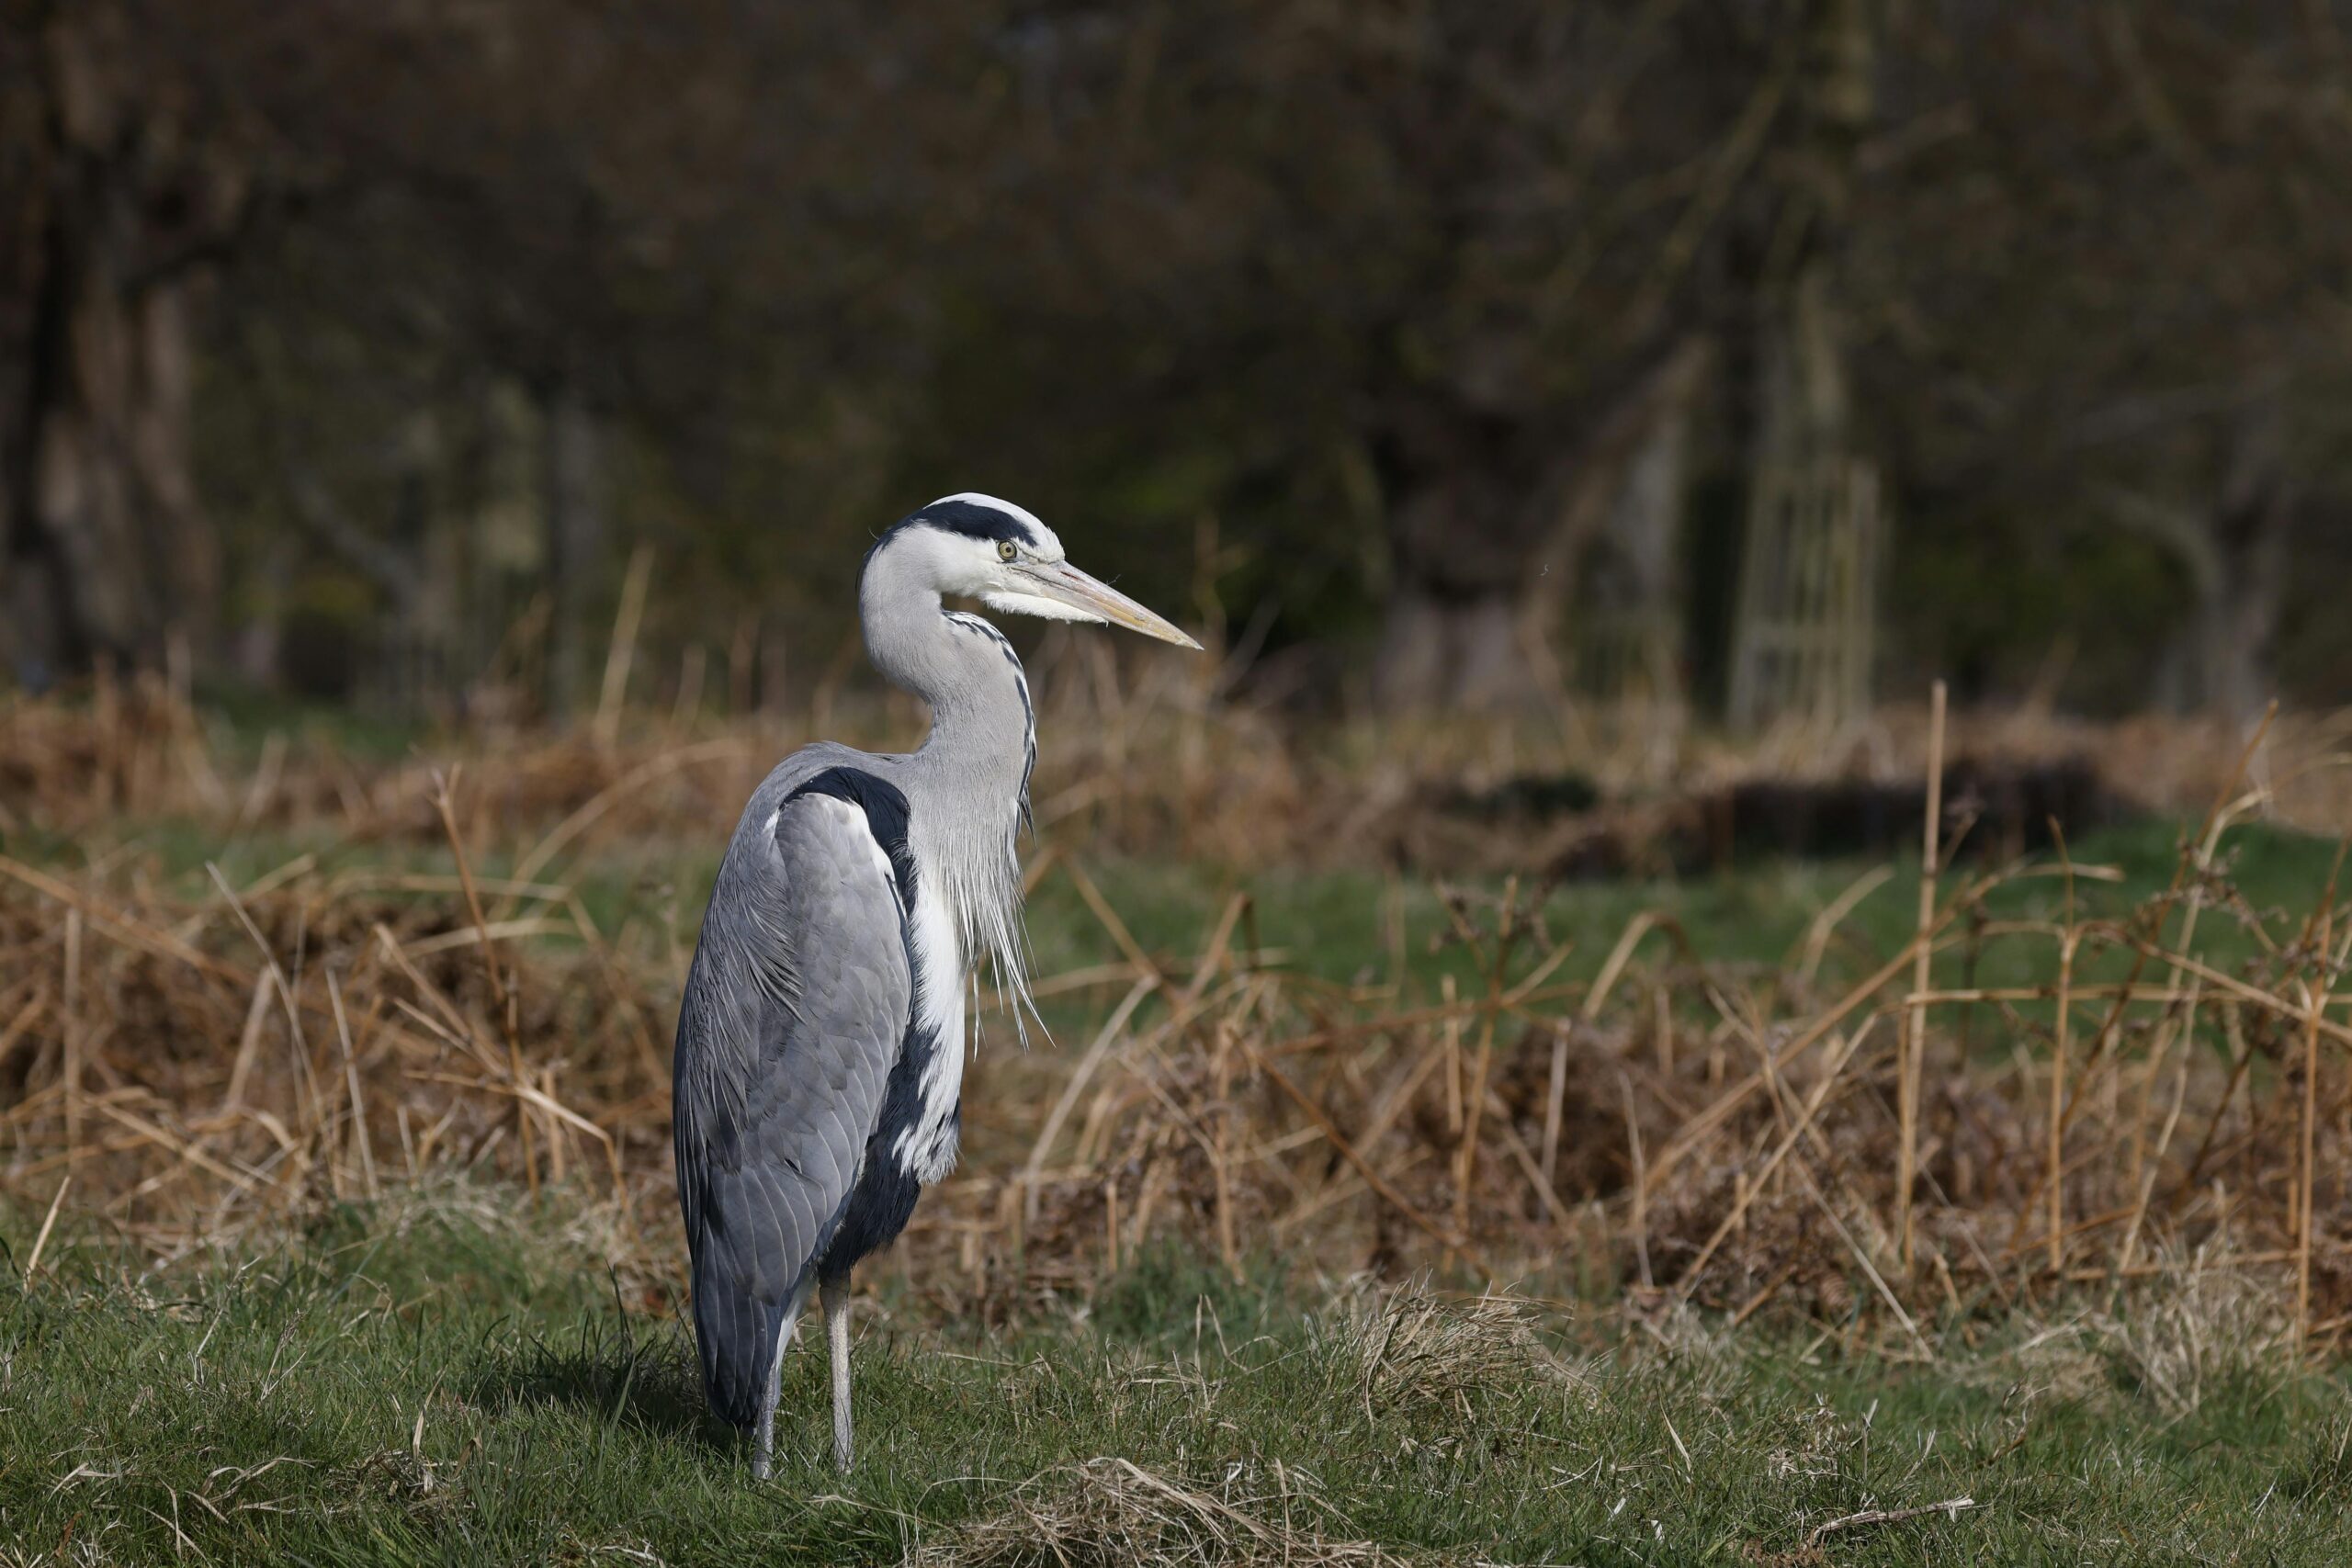
You’ve found a grey heron on your local canal or river, raised the camera… and come home with a soft, distant record shot or a silhouette against bright water. This guide answers grey herons – how do you photograph them? with a simple, repeatable path: find a reliable spot, position yourself for workable light, approach without flushing the bird, then use dependable settings for still/hunting versus take-off/flight. Finally, you’ll get practical composition ideas and a light-touch editing workflow that keeps your heron looking natural in typical British conditions.
What makes grey herons tricky to photograph (and how to use that to your advantage)
Stillness isn’t the same as “easy”
Grey herons often look statue-still, but they make tiny, constant adjustments: a slow head turn, a blink, a subtle sway as they balance. At long focal lengths those micro-movements are enough to blur detail, especially around the eye and bill. Treat them like a live subject even when they’re “not doing anything”: keep shutter speeds sensible, focus precisely on the eye, and shoot short bursts rather than single frames to increase your keeper rate.
The UK light problem: grey-on-grey days, glare off water
In Britain you’ll frequently be photographing a grey bird against grey water under bright cloud. Contrast is low, so autofocus can hunt and images can look flat. On the other hand, a heron’s pale head and neck can blow out quickly when sun hits it, and reflective water can fool your meter into underexposure. The advantage is that herons often tolerate people at busy watersides, letting you practise technique repeatedly. If you learn to control exposure and pick a clean angle, they’re one of the best local “training” subjects for sharpness, patience and timing.
Where to photograph grey herons in the UK (reliable, ethical setups)
Urban parks, canals and city rivers (best for close range)
If your goal is frame-filling detail, start where herons see people every day: park lakes, canal towpaths, slow city rivers and managed fishing waters. In these spots a heron may continue hunting while you work, as long as you don’t walk straight at it. Look for shallow margins, weirs, sluices and rafts of floating vegetation where small fish gather. The background can be messy in town, so your job is to find an angle that removes benches, railings and cars from behind the bird.
Estuaries and gravel pits (bigger views, more flight chances)
For more natural backgrounds and better chances of take-off and fly-past shots, try estuaries, saltmarsh edges, gravel pits and larger reservoirs. You’ll often be further away, but birds have space to move, and you may get classic behaviour: slow stalking, sudden spearing, wing-stretches, and commuting flights between feeding spots. On tidal water, note that birds reposition with the waterline; you can plan to be waiting rather than chasing.
Positioning basics: keep the water behind you, use banks/reeds as cover
Whenever possible, place the water behind you so the heron is lit from the front or side rather than backlit. Use the near bank, reeds, posts or a low hedge as a screen so you appear less “tall and direct”. If you can, get down to the bird’s level (kneeling works on towpaths and muddy edges) to improve background blur and make the image feel more intimate.
Fieldcraft: how to get close without flushing a grey heron
Read the “warning signs” (neck stretch, body angle, stepping away)
A grey heron will often give you plenty of notice before it goes. Watch for a long, upright neck (it’s measuring you), the body turning away, or one deliberate step that increases distance. Some will start “walking off” with that slow, careful stride; if you continue advancing, take-off is likely. When it pauses, you pause. If it relaxes and resumes looking into the water, you can continue—slowly. If it keeps angling away, stop and accept that you’re already too close for today.
Approach method: slow zig-zag, pause on their movements, use natural screens
Direct approaches feel predatory. Instead, take a gentle zig-zag path, occasionally turning your body slightly away as you walk. Keep your movements smooth and predictable—no sudden stops right next to the bird, no fast steps when it looks up. A good rule: only move when the heron is focused on hunting or preening, and freeze the moment it lifts its head to watch you.
Use whatever the site gives you: a reedbed edge, a moored boat, a bridge parapet, even the shadow line of a bank. If you’re on a narrow towpath, let cyclists and walkers pass first; a heron may tolerate constant background traffic but flush at the one person who breaks the pattern by stepping off the path and closing distance quickly.
Ethics and law in the UK: distance, nests, disturbance, dogs/paths
In the UK, deliberately disturbing birds at or near the nest can be an offence. Herons nest in colonies (heronries), often high in trees; avoid close approach during the breeding season and never try to “get the shot” by pushing into a nesting area. Around feeding birds, keep a respectful distance, stick to paths where possible, and be extra cautious if you have a dog with you—many herons flush at a dog long before they’d worry about a quiet photographer.
Camera and lens choices that work for grey herons
Sensible focal lengths in real UK spots (300–600mm guidance)
For most UK watersides, a 300mm lens on a crop-sensor body (or 400mm on full-frame) is a workable starting point for perched and hunting shots. If you mainly shoot larger pits or estuaries, 500–600mm becomes more useful, but remember: more reach also magnifies shake, heat haze and focus errors. If your lens is shorter, lean into environmental portraits—include reeds, reflections and water texture—and concentrate on clean backgrounds and strong behaviour rather than feather-level detail.
Stabilisation support: monopod/tripod vs hand-held on towpaths
On towpaths and uneven banks, a monopod can be the sweet spot: quick to reposition and steadier than hand-holding for long waits. A tripod is excellent for patient hunting shots, but can be awkward when people are passing behind you. If you’re hand-holding, stabilisation helps, but don’t rely on it alone—good shutter speed still matters. Wet edges are common; sturdy footing makes a difference, and if you’re often on slippery banks it’s worth reading why waterproof walking boots help for bird watching.
Phone and bridge camera options (how to maximise results)
With a phone, your best results come from close, tolerant urban birds and good light. Avoid heavy digital zoom; instead, shoot, keep steady, and crop lightly. Bridge cameras can do well: use their widest aperture, stabilise against a railing, and prioritise shutter speed over low ISO when the heron moves.
Best settings for photographing grey herons (starting points you can trust)
For a still or hunting heron (sharp eye, soft background)
For the classic wading/heron portrait, aim for a setup that prioritises the eye and keeps the bill sharp without turning the background into distracting detail.
- Mode: Aperture Priority (A/Av) is simple and effective; Manual (M) with Auto ISO is great if light is changing near water.
- Shutter speed: Start around 1/800s for a standing bird, and don’t be afraid to push to 1/1000–1/1600s if the heron is actively hunting or you’re on a long lens in a breeze.
- Aperture: Typically f/5.6–f/8. Use f/5.6 for more background blur; use f/8 if you’re close and want a little extra depth for the bill.
- ISO: Let ISO rise as needed; modern cameras handle ISO 800–3200 well for wildlife. A slightly noisy sharp image beats a clean blurred one.
- AF: Single-point AF on the eye is reliable. Eye-detect can work, but check it’s actually finding the eye rather than the dark shoulder feathers.
- Drive: Short bursts of 3–6 frames help you catch the moment between micro-movements.
Before you raise the camera, watch behaviour through binoculars so you can anticipate the strike rather than reacting late. If you want a refresher on what specs matter, see Binoculars: understanding the tech specs.
For herons taking off or flying past (wings, panning, burst)
Grey herons are large, but their wingbeats are quicker than you expect when they launch. The take-off moment is also when many photos fail: focus slips to the background, shutter speed is too slow, or the bird becomes a silhouette against sky.
- Shutter speed: Start at 1/2000s for reliable sharp wings. In bright conditions you can go 1/2500–1/3200s. If light is poor, don’t drop below 1/1600s unless you’re deliberately aiming for motion blur.
- Aperture: f/5.6–f/7.1 is a good balance. A slightly smaller aperture can improve sharpness and give you a bit more margin if focus isn’t perfect.
- AF mode: Continuous AF (AF-C / AI Servo). Use a wider AF area or tracking mode so you can keep the bird within the focus zone as it moves.
- Burst: High-speed continuous. Start shooting a fraction before the bird lifts—often you’ll see it crouch slightly, lean forward, or open its wings partway.
- Technique: Keep both eyes open if you can, and pan smoothly through the movement. Don’t “stab” the shutter; squeeze and keep moving.
- Exposure compensation: If the bird is against bright water or sky, dial in +0.3 to +1 EV to avoid a dull, underexposed subject. If the sun is striking white water, you may need the opposite (see below).
If you want another UK bird photography walkthrough for a different type of subject, the approach in Capturing the Majesty of Kestrels Through Photography is a useful contrast: herons reward patience and small adjustments, while kestrels often demand quicker reactions and more tracking.
Dealing with white highlights on the head/neck and reflective water
Herons can look “blown” on the head and neck even when the rest of the bird is fine. If you shoot RAW, you’ll have more room to recover highlights, but it’s still best to protect them in-camera.
- Check your histogram and highlight warnings after a quick burst.
- In harsh glare, try -0.3 to -1 EV exposure compensation to hold detail in white feathers and water reflections.
- When the water behind the bird is very bright, recompose so the heron is against darker reeds or bank, or wait for a cloud to soften the scene.
Composition ideas that consistently improve grey heron photos
The classic “hunter” portrait: eye, bill line and negative space
A strong heron image usually has one clear story: the hunter watching the water. Place the eye on a rule-of-thirds point, keep the long bill unobstructed, and leave space in front of the bill so the bird has somewhere to “look into”. If the heron is angled slightly towards you, you’ll often see more of the eye and get a more engaging portrait. A low viewpoint helps the bird feel tall and purposeful rather than “looked down on”.
Behaviour shots UK birders love: spearing, shaking, swallowing, wing-stretch
Once you’ve got the safe, sharp portrait, stay ready for the moments that lift a photo beyond a record. Watch for the slow stalk, then the sudden jab; the head shake that sends droplets flying; the swallow with the bill pointing up; or the wing-stretch that shows size and structure. These moments are brief, so keep your shutter speed up and your framing a touch wider than you think you need—cropping a little later is better than chopping wing tips in the excitement.
Background control: get low, separate with distance, avoid cluttered far bank
The biggest “invisible” improvement is background choice. Move a few metres left or right until the heron is backed by reeds, shadowed trees or open water rather than the far bank. Increase separation by getting lower and by photographing when the bird is further from the background. A clean backdrop makes the grey plumage look richer and the bird’s shape clearer.
Timing and conditions: when to press the shutter in Britain
Best times: early morning canals; winter low sun; after rain for calmer water
Early mornings on canals and park lakes are often ideal: fewer people, calmer water, and softer light. In winter, the low sun can give you gentle side-light for texture without the harsh overhead glare you get in summer. After rain, water can be darker and less reflective, and a heron’s plumage may show more detail. On overcast days, treat the light as a giant softbox: expose carefully, add a touch of contrast later, and focus on behaviour and clean backgrounds.
Wind direction and tide (estuaries): plan for take-off angles
Birds often take off into the wind. If you’re on an estuary path, a light headwind can bring take-offs and landings towards you, giving better angles for flight shots. With tide, herons may follow the moving edge to keep feeding in shallow water; if you know the tide times, you can be waiting where they’re likely to pass rather than continually walking after them.
Common mistakes (and quick fixes) when photographing grey herons
- Soft images: Your shutter speed is too low or you’re focusing on the body. Raise shutter speed and put AF on the eye; use short bursts.
- Heat haze over water: On warm days, shoot earlier or reduce distance—no amount of sharpening fixes shimmer.
- Shooting down from a bridge: It flattens the bird and worsens backgrounds. Get to bank level where safe and allowed.
- Busy far bank: Take two minutes to change your angle so the background becomes water or reeds.
- Overcropping: If you’re cropping to a tiny fraction, you were too far away. Work on fieldcraft and choose more tolerant spots.
- No catchlight in the eye: Shift your position so the light comes slightly from behind you, or wait for a brighter patch of sky.
- Walking straight at the bird: Use the zig-zag approach, pause when it watches you, and accept the distance it’s comfortable with.
Simple editing workflow for grey heron photos (
keep it natural)
You don’t need heavy editing for grey herons; most improvements come from protecting highlights, keeping the eye crisp, and removing small distractions. A simple, repeatable workflow:
- Shoot RAW if you can. It gives you more headroom to recover detail in pale head/neck feathers and reflective water.
- Set a neutral white balance. UK water often pushes images blue/green. Nudge temperature slightly warmer and reduce green tint a touch, but avoid making the bird look brown.
- Recover highlights first. Pull highlights down until detail returns on the crown, face and shoulder line. If the water is blown, accept it or crop tighter—don’t over-darken the whole frame to “save” sparkling reflections.
- Lift shadows carefully. A small shadow lift can reveal feather texture on the body, but too much makes the image look grey and crunchy. If you brighten shadows, add a little contrast back afterwards.
- Selective sharpening. Sharpen the eye, face and bill more than the body. If your software allows masking, keep sharpening off smooth water and background reeds to avoid noise and halos.
- Crop with intent. Crop to strengthen the story: leave space in front of the bill, keep the legs/feet or reflection if they add to the image, and avoid amputating the bill tip. If you’re cropping heavily, treat it as feedback to work on distance and positioning next time.
- Remove distractions lightly. If there’s one bright twig, a bit of litter, or a small hotspot on the water, a subtle heal/clone can help. Don’t rebuild the whole scene—wildlife photos look best when they still feel honest.
As a quick self-check, zoom out to fit the image on screen: if your eye goes straight to the heron’s eye and bill line, you’ve done enough. If you’re noticing crunchy feathers, strange colours, or glowing outlines, back off the sliders.
Final thoughts
If you want better grey heron photos in the UK, focus on a repeatable recipe rather than chasing “lucky moments”. Pick a reliable local water (a canal, park lake or slow river), put the light behind you, and approach indirectly until the bird stays relaxed. Then use two dependable setting sets: a still/hunting setup (around 1/800–1/1600s, f/5.6–f/8, eye focus, short bursts) and a flight setup (around 1/2000s+, AF-C and continuous burst). Finally, simplify your backgrounds by moving a few metres and getting lower.
This week’s practice challenge:
- Get one sharp, eye-level hunting portrait with a clean background.
- Get one take-off sequence (even if it’s distant) where at least one frame has the head and eye sharp.
Do that a few times at the same spot, and you’ll quickly learn what distance your local herons tolerate, what exposure keeps the pale head detailed, and which angles give you calmer water and cleaner frames—without disturbing the bird.

